Post by Admin on Jul 12, 2016 15:02:43 GMT
Guess this is it. Sorry I had become busy with my PS-1 , I had been assigned to work on an EchoSounder prototype in the Navy. Glad that's done, I have time for QSTP.
This is lesson is all about attaching or reading from external memory.
This is a little far fetched but , by the time you have reached here. I am fairly certain most of you will be confused with whatever you know.But in time and practice, Everything is gonna be fine and the "ClicK" will become faster.
For this, we need a library And its called "SD" ?/ you can check out the information on this Library here.
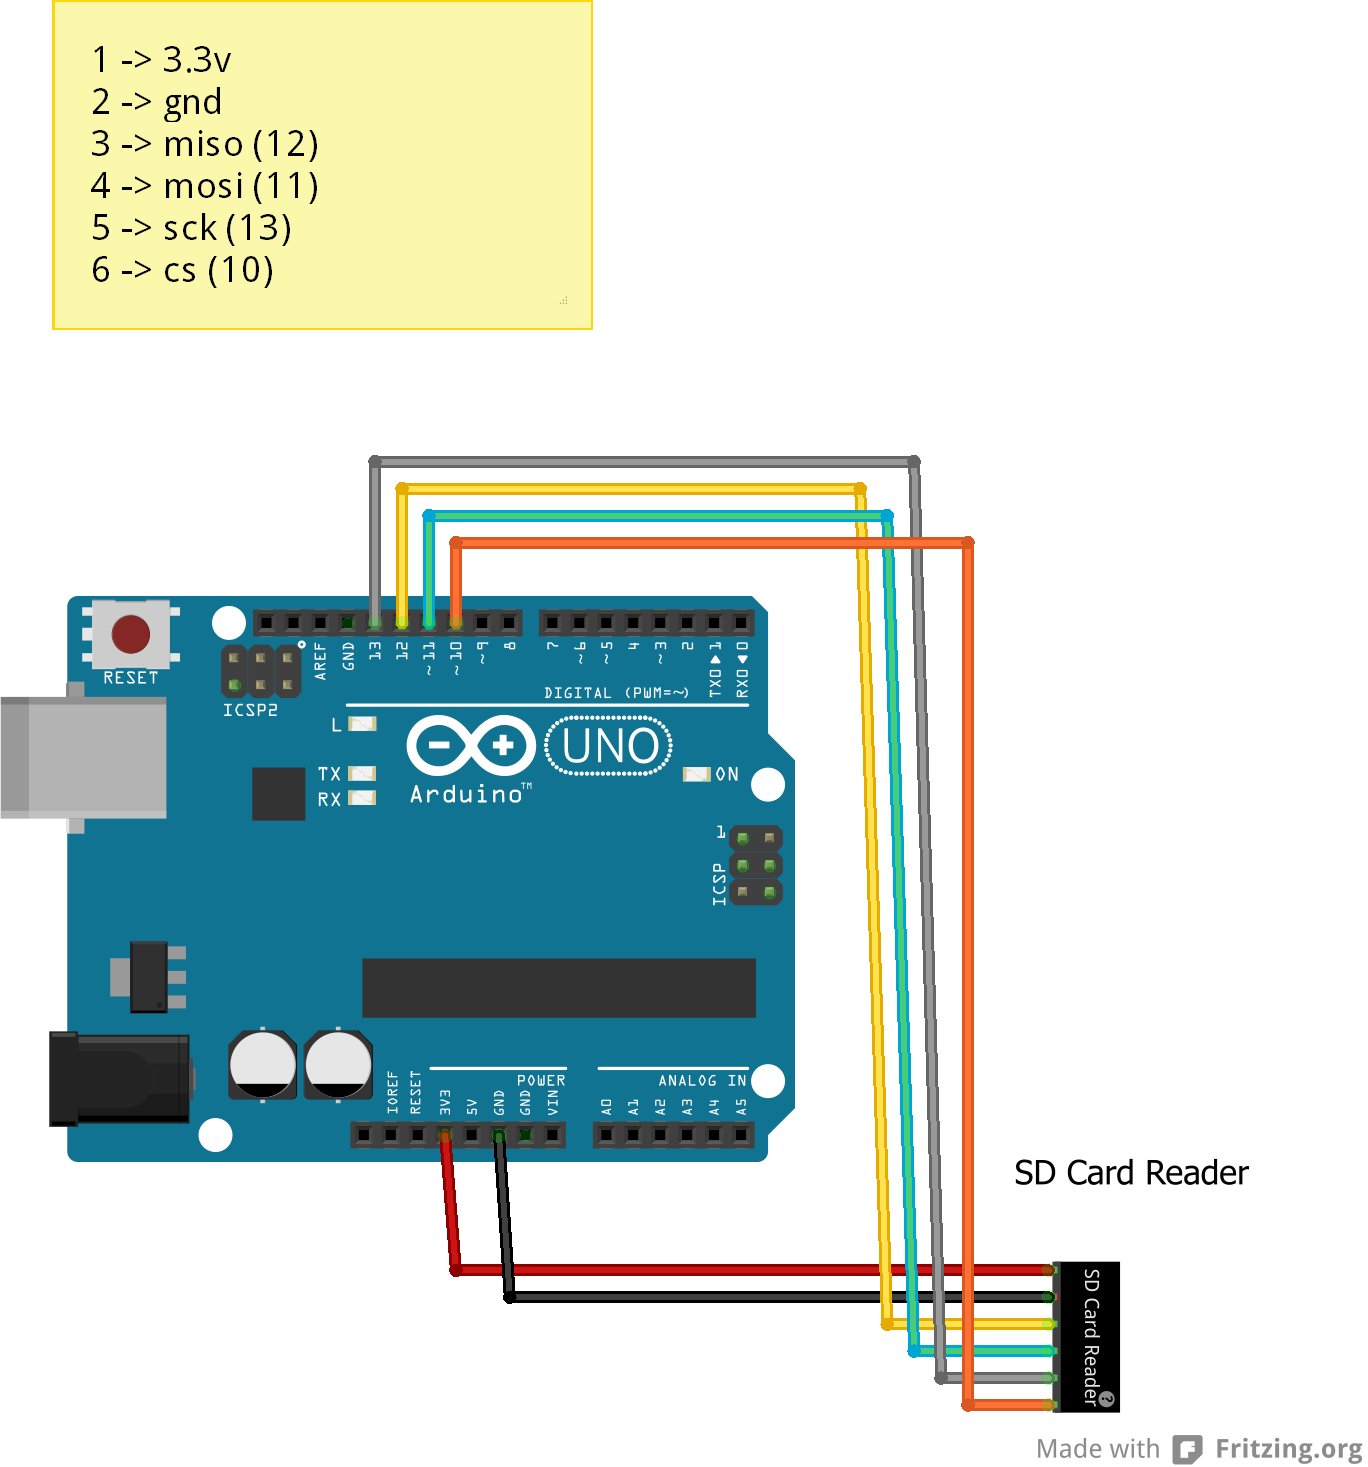
Secondly We need to connect like this.

Sounds vague and demanding? Its fine >.< Geeks can check what each means here
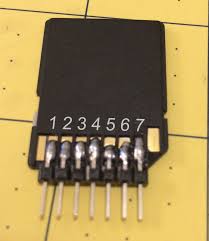
Lets get on to with the code . Oh yea before you start .. Try soldering a Cheap SD card reader like this . Before you connect your SD card reader.

The code below is configured for use with an Ethernet shield, which has an onboard SD slot. In the setup(), we call SD.begin(), naming pin 4 as the CS pin. This pin varies depending on the make of shield or board you are using.
In setup(), create a new file with SD.open() named "test.txt". FILE_WRITE enables read and write access to the file, starting at the end. If a file "test.txt" was already on the card, that file would be opened.
Name the instance of the opened file "myFile".
Once opened, use myFile.println() to write a string to the card, followed by a carriage return. Once the content is written, close the file.
Again, open the file with SD.open(). Once opened, ask the Arduino to read the contents of the file with SD.read() and send them over the serial port. After all the contents of the file are read, close the file with SD.close().
This is lesson is all about attaching or reading from external memory.
This is a little far fetched but , by the time you have reached here. I am fairly certain most of you will be confused with whatever you know.But in time and practice, Everything is gonna be fine and the "ClicK" will become faster.
For this, we need a library And its called "SD" ?/ you can check out the information on this Library here.
Secondly We need to connect like this.

Sounds vague and demanding? Its fine >.< Geeks can check what each means here
Lets get on to with the code . Oh yea before you start .. Try soldering a Cheap SD card reader like this . Before you connect your SD card reader.
The code below is configured for use with an Ethernet shield, which has an onboard SD slot. In the setup(), we call SD.begin(), naming pin 4 as the CS pin. This pin varies depending on the make of shield or board you are using.
In setup(), create a new file with SD.open() named "test.txt". FILE_WRITE enables read and write access to the file, starting at the end. If a file "test.txt" was already on the card, that file would be opened.
Name the instance of the opened file "myFile".
Once opened, use myFile.println() to write a string to the card, followed by a carriage return. Once the content is written, close the file.
Again, open the file with SD.open(). Once opened, ask the Arduino to read the contents of the file with SD.read() and send them over the serial port. After all the contents of the file are read, close the file with SD.close().
/*
  SD card read/write

 This example shows how to read and write data to and from an SD card file
 The circuit:
 *  SD card attached to SPI bus as follows:
 ** MOSI - pin 11
 ** MISO - pin 12
 ** CLK - pin 13
 ** CS - pin 4


 */

#include <SPI.h>
#include <SD.h>

File myFile;

void setup() {
  // Open serial communications and wait for port to open:
  Serial.begin(9600);
  while (!Serial) {
    ; // wait for serial port to connect. Needed for native USB port only
  }


  Serial.print("Initializing SD card...");

  if (!SD.begin(4)) {
    Serial.println("initialization failed!");
    return;
  }
  Serial.println("initialization done.");

  // open the file. note that only one file can be open at a time,
  // so you have to close this one before opening another.
  myFile = SD.open("test.txt", FILE_WRITE);

  // if the file opened okay, write to it:
  if (myFile) {
    Serial.print("Writing to test.txt...");
    myFile.println("testing 1, 2, 3.");
    // close the file:
    myFile.close();
    Serial.println("done.");
  } else {
    // if the file didn't open, print an error:
    Serial.println("error opening test.txt");
  }

  // re-open the file for reading:
  myFile = SD.open("test.txt");
  if (myFile) {
    Serial.println("test.txt:");

    // read from the file until there's nothing else in it:
    while (myFile.available()) {
      Serial.write(myFile.read());
    }
    // close the file:
    myFile.close();
  } else {
    // if the file didn't open, print an error:
    Serial.println("error opening test.txt");
  }
}

void loop() {
  // nothing happens after setup
}


A last Question...

Hook your Buzzer and play music from your Sd card :P . hint ( PIPE data )


Would give you my github link on that. But its private. So no point in checking :P
