Post by Admin on May 21, 2016 6:36:21 GMT
I recommend everyone of you mentees to read through what i have written! ASK for doubts, be however silly! Trust me, We dont know how informative this can get!.
LETS START! - LESSON-1
Now we are ready for the moment of truth, It's time to plug your Arduino in and power it up. The most common way to do this is to plug one end of the USB cable into the Arduino and the other end into a computer. The computer will then power the Arduino. Or after a program has been written in to it. It saves the hex file machine code in itself which has 32KB of memory. And you can later power it back on and the code starts looping. [ I will get into detail about this in the next lesson]
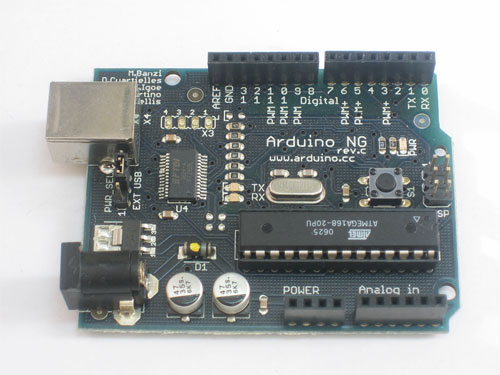
ARDUINO uno r3 CONTAINS 14 digital PINs labled 0-13 and 6 Analog Pins labled 0-5. As you can see in the picture below.. And also you can have a look at your own pieces.

Okhay lets get started with a small code? Before that The pin 13 has an inbuilt LED attached with a resistor to it. So lets try giving HIGH to it?.
So take out your A-B cable ( which looks like a square at one end and an USB 2.0 at the other end. Plug it into your arduino and open Arduino.exe from the Desktop. Linux users kindly post if you have doubts.
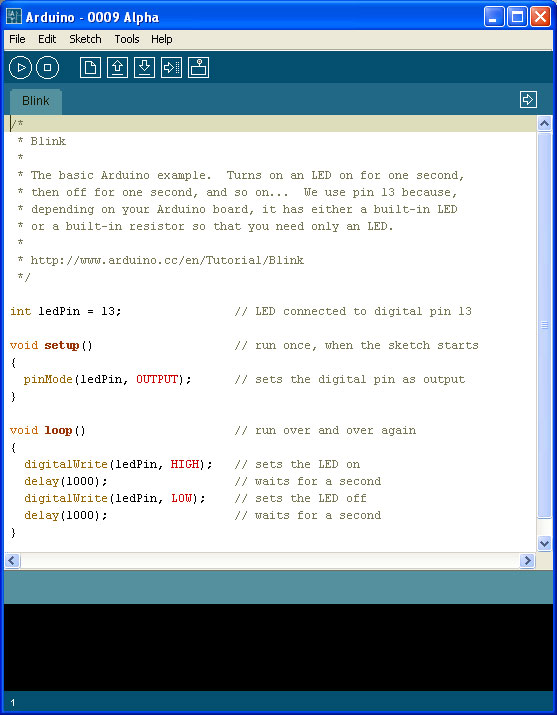
The code contains 2 parts :- Create a new sketch, click okhay and it would look like this : void setup() and void loop()

// and /* */ are used to comment. As you can see in the code i have put.
To better understand procedures, lets use an analogy to the kinds of procedures we're used to
FUN RIGHT!
Procedural calls. The loop is looped..
Assuming all of you know C. delay() functions takes in values in milliseconds. SO the blink code -> in the examples of arduino gives u a blink on the orange coloured led attached to the board blink every one second and is OFF for another second and it loops.
SAVE THE PROGRAM.. and click Sketch on top and compile. TO check for errors.. You can any errors on the bottom..
AS here , if no error then it should come like this or may be something that goes this way..

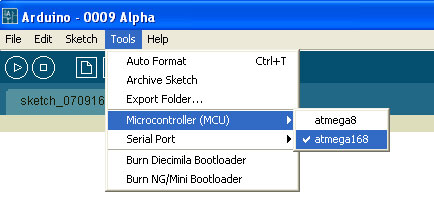
Okhay Now thats done . . Head over to TOOLS -> Select your micro controller chip named on the IC ( A BLACK RECTANGULAR THING THAT GOES ATMEGA128.. etc }

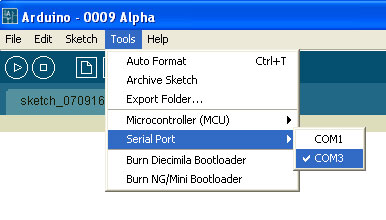
Select the COM PORT where your Arduino is connected to. Dont worry it will mention!

After thats done. Select your board ( ARduino Uno under Tools again )
Then click on UPLOAD it will be a button next to the verify one .. ( which looks like a tick ) !! I hope you understood that!! I will put up the next lesson on 23rd May! Try innovating, Use digitalread(), and try more complex ways ( its lame but i mean, We are starting from scratch!! )
LETS START! - LESSON-1
Now we are ready for the moment of truth, It's time to plug your Arduino in and power it up. The most common way to do this is to plug one end of the USB cable into the Arduino and the other end into a computer. The computer will then power the Arduino. Or after a program has been written in to it. It saves the hex file machine code in itself which has 32KB of memory. And you can later power it back on and the code starts looping. [ I will get into detail about this in the next lesson]
ARDUINO uno r3 CONTAINS 14 digital PINs labled 0-13 and 6 Analog Pins labled 0-5. As you can see in the picture below.. And also you can have a look at your own pieces.

Okhay lets get started with a small code? Before that The pin 13 has an inbuilt LED attached with a resistor to it. So lets try giving HIGH to it?.
So take out your A-B cable ( which looks like a square at one end and an USB 2.0 at the other end. Plug it into your arduino and open Arduino.exe from the Desktop. Linux users kindly post if you have doubts.
The code contains 2 parts :- Create a new sketch, click okhay and it would look like this : void setup() and void loop()

void setup() /* this is were the code is initialized with the variables. In the above code, the mode for the pins where estbalished as OUTPUT. This means , the code included that pin number 13 that is the 14th pin was either 1 or 0 , High of low , 5V or 0V ( dont get confused with 0 or GND). Establishing it as INPUT would mean, it takes in a value, Since its a digital pin, A standard 5V would mean 1,HIGH and anything lesser than 2 volts approx would mean 0 or LOW. */void loop() /* this when the arduino processors starts compiling from, already assuming the above values and references from void setup(), digitalWrite(), this when the code tells the processor chip to give a HIGH to the 13th pin. (digitalWrite(13,1); , digitalWrite(13,HIGH), works the same */ // and /* */ are used to comment. As you can see in the code i have put.
To better understand procedures, lets use an analogy to the kinds of procedures we're used to
clean cat wash the cat(dirty cat)                    // a procedure for washing the cat
{
	turn on the shower.
	find the cat.
	grab the cat.
	put cat under shower.
	wait 3 minutes.                                     // wait for cat to get clean.
	release cat.
}
FUN RIGHT!
Procedural calls. The loop is looped..
void loop()                     // run over and over again
{
  digitalWrite(ledPin, HIGH);   // sets the LED on
  delay(1000);                  // waits for a second
  digitalWrite(ledPin, LOW);    // sets the LED off
  delay(1000);                  // waits for a second
}
Assuming all of you know C. delay() functions takes in values in milliseconds. SO the blink code -> in the examples of arduino gives u a blink on the orange coloured led attached to the board blink every one second and is OFF for another second and it loops.
SAVE THE PROGRAM.. and click Sketch on top and compile. TO check for errors.. You can any errors on the bottom..
AS here , if no error then it should come like this or may be something that goes this way..

Okhay Now thats done . . Head over to TOOLS -> Select your micro controller chip named on the IC ( A BLACK RECTANGULAR THING THAT GOES ATMEGA128.. etc }

Select the COM PORT where your Arduino is connected to. Dont worry it will mention!

After thats done. Select your board ( ARduino Uno under Tools again )
Then click on UPLOAD it will be a button next to the verify one .. ( which looks like a tick ) !! I hope you understood that!! I will put up the next lesson on 23rd May! Try innovating, Use digitalread(), and try more complex ways ( its lame but i mean, We are starting from scratch!! )
